Add Row
Add Element
cropper
update
Everyday Lifestyles
update
Add Element
  • Home
  • Categories
    • lifestyle
    • wellness
    • family
    • health & beauty
    • Technology
    • Featured
  • Sports
  • Featured
  • Relationships
  • Business
  • Social Media Marketing
June 07.2025
3 Minutes Read

Apple Snicker Salad: A Fun and Easy Treat Your Kids Will Love

Apple Snicker Salad with caramel and chocolate bars.

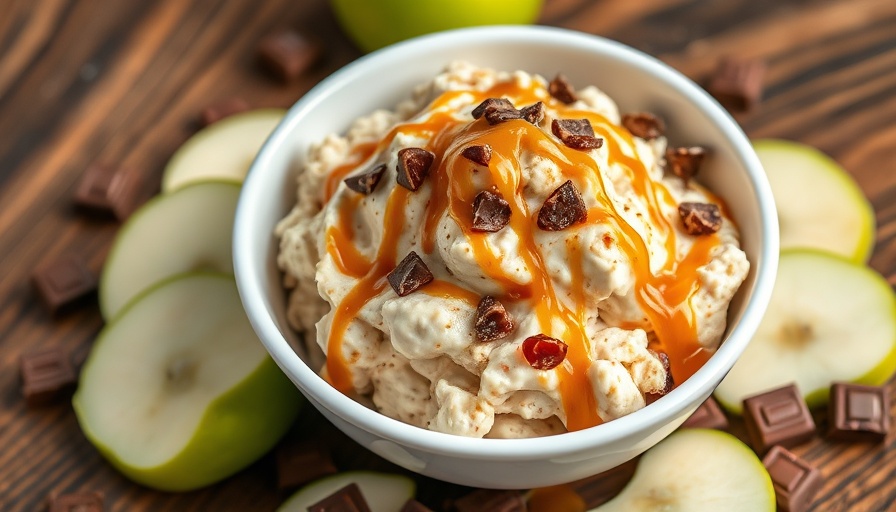
Delightfully Creamy & Crunchy: Discover Apple Snicker Salad

As summer rolls in, it’s the perfect time to explore fresh, fun, and easy recipes that your family will adore. One recipe that stands out is the Apple Snicker Salad: a delightful blend of creamy goodness and crunchy bites of tart Granny Smith apples. Not only is it quick and easy to prepare (just 15 minutes!), but its vibrant flavors are sure to bring smiles to your school-aged kids and the whole family.

Why This Dessert Salad Will Become a Family Favorite

What makes this Apple Snicker Salad a hit in many households? For starters, it has all the right elements: it’s creamy, crunchy, and distinctly chocolatey with the added bonus of bright, tart apples. Homemade whipped cream is the genuine star of this dessert, compared to store-bought alternatives like Cool Whip, ensuring that your family indulges in only the best ingredients. Coupled with a drizzle of caramel sauce, it’s not hard to see why this recipe may become a staple at your family gatherings.

Ingredient Essentials for a Perfect Apple Snicker Salad

So, what do you need to make this sweet treat? The core ingredients include:

  • Granny Smith Apples: Their firm texture and zesty taste provide the right contrast to the creamy elements of this dish.
  • Snickers Bars: Mini or snack-sized ones add just the right amount of chocolatey sweetness and a bit of chewiness.
  • Lemon Juice: Just a teaspoon works wonders to keep those apples looking fresh and vibrant.
  • Heavy Cream: Essential for creating fluffy whipped cream that makes this dessert luxurious.
  • Powdered Sugar: Adds sweetness, allowing you to control the level of indulgence.
  • Chocolate Chips: Extra chocolate never hurts! Use a mix of semi-sweet and milk chocolate for balance.

Customization: Making This Dessert Your Own

One of the best features of this Apple Snicker Salad is its versatility. You can easily switch up the flavors and textures based on your family's preferences or what’s readily available. For instance, if Snickers aren’t your favorite, consider swapping in Milky Way or Almond Joy bars. Each alternative brings a unique twist to the traditional salad. Want to add some crunch? Throw in some chopped nuts like almonds or walnuts, which not only enhance the flavor but also boost the nutritional value.

Sharing Moments: Apple Snicker Salad as a Conversation Starter

This simple, yet impressive dessert can open the door to many family conversations. As you prepare it together, share stories of summer gatherings, and encourage your kids to express what they would love to add to the dish. This not only enhances their creativity but strengthens family bonds through shared culinary experiences.

Perfect for Any Occasion: Versatility at Its Best

The Apple Snicker Salad isn't just a summer dessert; it can feature at any gathering, from potlucks to birthday parties, or even as a sweet treat for a family movie night. Its easy preparation and eye-catching presentation make it a breeze to whip up before friends or family arrive.

Final Touch: Serve it Right!

To elevate your dish, serve it in a beautiful bowl with a sprinkling of additional toppings on the top such as more chopped Snickers, nuts, or a drizzle of caramel sauce. The visual appeal is sure to enhance your family’s excitement for dessert!

Call to Action: Try It Today!

Why not gather your kids and prepare a batch of Apple Snicker Salad today? It's quick, fun to make, and brimming with flavors that are sure to impress. Together, you can create lasting memories while indulging in a delicious treat that’s perfect for any occasion. Share your own variations and experiences—you might inspire other families to discover this delightful salad!

Food & Recipes

0 Views

0 Comments

Write A Comment

*
*
Related Posts All Posts
08.04.2025

Discover Savory Cottage Cheese Breakfast Bowls for a Healthy Start

Update Wake Up to Flavor: The Cottage Cheese Breakfast Revolution In recent years, cottage cheese has made quite the comeback in the culinary world, and for good reason. These savory cottage cheese breakfast bowls are not just a meal; they're a hearty way to kickstart your day with a flavor explosion. Embracing a blend of textures and tastes, each bowl serves as a canvas for your breakfast imagination. Why Cottage Cheese? The Protein-Packed Hero Cottage cheese is a treasure trove of protein, making it a perfect choice for those looking to fuel their mornings healthily. It contains around 25 grams of protein per cup, making it a significant source for anyone looking to build muscle or simply maintain energy levels throughout the day. This creamy delight complements various toppings, allowing you to customize your bowl to match your cravings. Crafting the Perfect Breakfast Bowl So, how do you construct the ultimate cottage cheese breakfast bowl? Start with a base of cottage cheese - feel free to choose between large or small curd varieties for your preferred texture. Then layer in vibrant vegetables such as fresh avocado, juicy cherry tomatoes, and colorful bell peppers for that much-needed crunch. Want to add some savory goodness? Consider crumbled bacon or sausage for an extra burst of flavor. Creative Customizations: Beyond the Basics This breakfast staple is not one-dimensional at all; it welcomes every innovation. Swap out savory toppings for a sweet medley, including fresh fruits like apples, berries, drizzled with honey or a sprinkling of cinnamon. Explore your palate – sautéed mushrooms or roasted sweet potatoes add a unique twist, while greens like arugula or spinach can elevate the dish, making it a nutrient-packed powerhouse. Meal Prep Magic: Convenience Meets Health In our fast-paced lives, convenience often trumps health. However, these cottage cheese breakfast bowls can be prepped ahead. You can store the ingredients separately and assemble them when ready – a game-changer for those hectic mornings. Preparing all your ingredients in advance not only saves time but also reduces morning decision fatigue. Imagine waking up to a stylishly layered bowl, ready to delight your taste buds! The Comfort of Tradition: Local Ingredients Connecting food to personal stories and local heritage enriches our eating experience. Cottage cheese breakfast bowls can take on different meanings depending on what local, seasonal ingredients are available. For example, you might find a regional farmer's market selling freshly picked tomatoes or eggs from free-range chickens nearby. Building meals around local produce not only supports the community but also enhances the flavors of your breakfast. Health Benefits: More Than Just Tasty Cottage cheese is rich in calcium and vital vitamins, making it a solid choice for enhancing your overall wellness. Its high protein content may even help reduce hunger levels, making it a fantastic choice for weight management. Its versatility means that you can easily modify this breakfast option to fit any dietary preference, and even make it vegetarian or vegan-friendly. Be Inspired: What This Dish Means to You This humble cottage cheese breakfast bowl symbolizes more than just a meal; it represents a shift in our relationship with food. Making informed choices about our breakfasts allows us to nourish our bodies while celebrating creativity in the kitchen. So the next time you're wondering what to prepare for breakfast, remember that a simple bowl of cottage cheese can lead to endless possibilities and encourage a lifestyle of wholesome eating! Try Your Hand at It! What’s stopping you from creating your own savory cottage cheese breakfast bowl? Gather your favorite ingredients, customize it to your taste, and share it with your family. You may even start a new morning tradition that everyone enjoys. Your breakfast adventure awaits!

08.04.2025

Transform Your Baking with Irresistible Brown Butter Frosting

Update Elevating Simple Desserts: The Magic of Brown Butter Frosting Brown butter frosting isn't just any ordinary frosting; it’s a culinary transformation that turns everyday treats into extraordinary delights. Parents of school-aged children know that school events and birthday parties often require a delicious touch, and this decadent frosting is perfect for those special occasions. With its rich, nutty flavor and slight hint of caramel, this frosting has a way of appealing to even the most selective taste buds. Simplifying the Frosting Process: A Step-by-Step Guide Making browned butter may sound intimidating, but it's surprisingly easy. To achieve that toasty flavor, all you need to do is melt your butter in a saucepan over medium heat. As it melts, keep an eye on the color; you're aiming for a golden brown shade. This process normally takes about 5 to 7 minutes. The scent of the butter will shift from fresh to nutty, signaling it’s time to remove it from the heat to prevent burning. Ingredient Breakdown: Choosing Quality Ingredients for Best Results When your recipe calls for just three ingredients—salted butter, powdered sugar, and vanilla extract—quality matters. For the butter, real high-fat butter is optimal, ensuring your frosting stands out with rich flavor and smooth consistency. This isn’t the time for margarine or shortening; those substitutes dilute the flavor and undermine the creamy texture of your frosting. Customization: Making Brown Butter Frosting Your Own This frosting is extremely versatile and can be tweaked to fit various desserts. Want a richer taste? Consider adding a pinch of sea salt or a dash of espresso powder for depth. Trying this with cookies? It pairs beautifully with sugar cookies, providing an elegant upgrade from the typical frosting. Children will love how it enhances their sweets, while parents will appreciate the homemade touch. Frosting Consistency: Tips for Perfecting Your Frosting Understandably, achieving the perfect consistency is crucial for any frosting. A common issue arises when you find your frosting too thick or thin. If it’s too thick, simply incorporate milk one teaspoon at a time until you achieve the desired texture. On the other hand, if it’s too thin, add extra powdered sugar gradually, mixing thoroughly in between. The goal is a spreadable frosting with a velvety finish, which is ideal for beautifying cakes and cupcakes alike. Storage Tips for Leftover Frosting One of the best attributes of this frosting is its storability. Leftover browned butter frosting can be stored in an airtight container in the fridge for up to two weeks. When you’re ready to use it, let it come to room temperature and give it a quick mix to restore its smooth texture. This makes it a perfect make-ahead option for busy parents or bakers. Why Families Should Embrace Homemade Treats In today's fast-paced world, preparing homemade treats can seem daunting. Yet, making frostings like this one not only elevates the quality of desserts but also brings families together. Baking and decorating can become fun, shared experiences, especially when children accompany their parents in the kitchen. These moments foster creativity and togetherness while imparting important culinary skills that children can use lifelong. A Delicious Upgrade for School Events As schools encourage healthy eating, homemade treats can balance indulgence with wholesome ingredients. Brown butter frosting can easily elevate a simple dessert into something spectacular, making it ideal for school bake sales, birthday parties, or holiday treats. Moreover, showing your kids how to create these delights instills a sense of pride and satisfaction that store-bought options simply can't replicate. So, gather your ingredients, explore the simple art of browning butter, and let your creativity shine. The next time your child needs a treat for school or a family gathering, impress friends and family alike with your unique homemade frosting! If you’re eager to try your hand at this delightful frosting, gather your ingredients today and bring the warmth of homemade treats into your family's life. After all, there’s nothing quite like sharing delicious, nourishing food with loved ones!

08.03.2025

Shortcut Garlic Aioli: A Deliciously Simple Way to Elevate Your Dishes

Update Elevate Your Meals with This Delicious Shortcut Garlic Aioli If you’ve ever thought of transforming your ordinary meals into gourmet experiences with a simple twist, look no further than this fantastic shortcut garlic aioli. Bursting with flavor, this easy-to-make dip not only enhances your culinary creations but also adds a personal touch to any dish. With just a few everyday ingredients, you can create a creamy, garlicky masterpiece that’s perfect for dipping, drizzling, or spreading. Understanding Aioli: A Brief Background Aioli, a classic Mediterranean condiment, originates from a blend of garlic and olive oil but has evolved over time to include various flavor profiles and textures. In modern cuisine, it’s often mistaken for mayonnaise; however, aioli usually has garlic as a prominent ingredient, lending a robust flavor. Depending on the region, you might find infused oils like truffle or sauces such as chipotle added for a unique kick. By preparing this shortcut version using mayonnaise, you can enjoy the essence of traditional aioli with minimal effort! The Magic of Simple Ingredients At the heart of this recipe lies a hearty half-cup of mayonnaise, freshly minced garlic, and a splash of lemon juice. These elements combine to create a rich and flavorful sauce that serves as a perfect accompaniment to grilled meats, seafood, or even fresh vegetables. For those who might be wary of raw garlic’s intensity, a quick roast can help mellow the flavor, transforming your aioli into a more subtle yet still delicious dip. Flavors That Fit Any Occasion This garlic aioli is incredibly versatile, allowing you to tailor it to suit your preferences. Want something spicy? Stir in sriracha or cayenne pepper. For a more herby profile, consider adding fresh basil or pesto. Feeling adventurous? Why not mix in some roasted red peppers or even some sun-dried tomatoes? The possibilities are endless, making it easy to create a dip that’s uniquely yours! How to Properly Store Your Aioli After whipping up this delightful dip, it’s crucial to store it correctly to maintain freshness and flavor. Keep your garlic aioli in a tightly sealed container in the fridge, and it should last for about two to three days. Just make sure to give it a good stir before serving again, as some separation may occur. Aioli Value Beyond the Plate Creating this garlic aioli is not just about flavor; it’s also about connection. Food has a magical way of bringing people together. Imagine serving this dip at your next family gathering or neighborhood party where guests eagerly gather around to dip fresh veggies or crispy potato chips. As they savor each bite, stories and laughter will soon fill the air. The value of such a simple recipe lies not only in its taste but also in the joy and connection it can foster among loved ones. Conclusion: Your Next Culinary Adventure Awaits! Don’t let the complexity of traditional recipes intimidate you. This shortcut garlic aioli is a testament to the magic of simplicity in cooking. Perfect for any meal, it invites creativity and personalization right into your kitchen. So gather those ingredients, whip up your aioli, and watch it become a staple in your culinary repertoire. Your taste buds will thank you, and who knows? You might just forge some wonderful new memories around the dinner table.

Terms of Service

Privacy Policy

Core Modal Title

Sorry, no results found

You Might Find These Articles Interesting

T
Please Check Your Email
We Will Be Following Up Shortly
*
*
*