Add Row
Add Element
cropper
update
Everyday Lifestyles
update
Add Element
  • Home
  • Categories
    • lifestyle
    • wellness
    • family
    • health & beauty
    • Technology
    • Featured
  • Sports
  • Featured
  • Relationships
  • Business
  • Social Media Marketing
June 23.2025
3 Minutes Read

Discover the Easy Secret to Making Irresistible Oreo Fluff Dessert

Easy Oreo fluff recipe in glass dishes on slate surface.

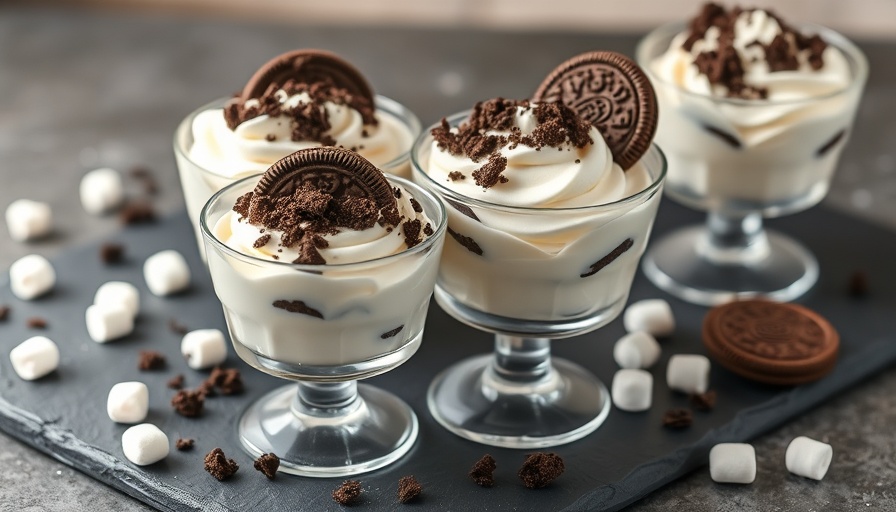
Indulge Your Family with the Ultimate Oreo Dessert

If you're a parent looking for a fun and tasty dessert that will delight your school-aged children, then look no further than this decadent Oreo Fluff. This easy-to-make, no-bake recipe will satisfy their sweet cravings and leave them wanting more. Plus, it's quick and simple enough that you can whip it up during a busy weeknight!

What Makes Oreo Fluff Special?

This delightful treat balances creamy and crunchy textures, thanks to the real whipped cream and crushed Oreo cookies that create a rich and satisfying dessert reminiscent of cookies and cream ice cream. The beauty of it lies in its versatility; you can use any flavor of Oreo cookies, from classic chocolate to golden vanilla or mint chocolate, making it a crowd-pleaser for all palates.

Ingredient Breakdown: Fresh is Best

To achieve that velvety texture, it's crucial to use real cream instead of Cool Whip or pre-packaged pudding mixes. Ingredients include:

  • Oreo Cookies: Crush them for the best texture. Mini Oreos can add a fun twist!
  • Cream Cheese: Ensure it’s softened to avoid lumps, contributing to a smooth consistency.
  • Heavy Cream: This thick cream is key for that luscious mouthfeel.
  • Mini Marshmallows: These provide a delightful chewiness without overwhelming the fluff.
  • Vanilla Extract: Real vanilla enhances the overall flavor, making each bite exceptional.

Chilling for the Perfect Texture

For the best experience, allow your Oreo Fluff to chill in the refrigerator for at least an hour. This crucial step helps the flavors meld together, resulting in a delightful dessert that’s both rich and refreshing. The added time creates a thicker and creamier texture, ensuring every spoonful is indulgent.

Creative Variations to Try

While the classic Oreo flavor is a family favorite, don’t hesitate to experiment! You can create variations using:

  • Grasshopper Fluff: Use mint chocolate Oreos for a refreshing twist.
  • Peanut Butter Delight: Incorporate a layer of peanut butter or even peanut butter cup pieces for that savory-sweet balance.
  • Fruit Fluff: Adding berries or banana slices can lighten the dessert while introducing fresh flavors.
These variations not only provide a fun way to mix things up but can also encourage your kids to help in the kitchen.

The Perfect Pairing: Make it a Dip!

This Oreo Fluff doesn't just have to be served on its own. Consider turning it into a dessert dip for family game nights or parties. Pair it with:

  • Buttery Ritz Crackers: Their saltiness complements the sweet fluff beautifully.
  • Graham Crackers: Perfect for a classic s’mores vibe.
  • Fresh Fruits: Strawberries or apple slices can add a refreshing crunch.
This versatility allows you to cater to different tastes while keeping it fun for the kids.

Long Lasting Delight: Storing Your Dessert

If you find yourself with any leftovers, store your Oreo Fluff in an airtight container in the refrigerator for up to 2-3 days. However, I promise it won’t last that long in your home! The flavors get better the longer it sits, allowing that creamy goodness to fully develop.

Final Thoughts: A Family Favorite

Oreo Fluff isn't just a dessert; it's an opportunity for families to bond over something delicious. During busy weeks or after a long day, being to create something this tasty together can be a delightful reprieve. It's a sweet reminder that the best moments often happen around the kitchen table.

As parents, we often seek ways to make cooking enjoyable for our kids. Recipes like this are a great opportunity to involve them in the process, teaching them about measurements, mixing, and, of course, the joy of indulging in a sweet treat afterward! So gather your ingredients and let the fun begin!

Food & Recipes

0 Views

0 Comments

Write A Comment

*
*
Related Posts All Posts
08.07.2025

Discover the Secrets to Bakery Style Chocolate Chunk Cookies for Your Family

Update Indulge in Bakery-Style Chocolate Chunk Cookies: A Parent's Guide to Easy BakingWhen it comes to baking, nothing compares to the rich, decadent experience of fresh, warm cookies straight from the oven. Especially when it’s Bakery Style Chocolate Chunk Cookies that capture the hearts of both parents and children alike. These cookies are more than just a treat; they evoke cherished memories of family gatherings and school celebrations.Why Choose Bakery-Style Cookies?The allure of bakery-style cookies lies in their thick, soft texture loaded with gooey chocolate goodness. They are not only charmingly oversized but offer a delightful contrast of rich milk chocolate and deep dark chocolate. As any busy parent knows, the kitchen can be a battlefield. But fear not! With this easy recipe, you can whip up a batch of cookies that families will adore, providing the perfect opportunity to bond over baking.Creating the Perfect CookieAccording to the recipe from The Stay-at-Home Chef, one key to achieving that fluffy, bakery-style texture is to chill or even freeze the dough balls for 20 minutes before baking. This method ensures your cookies maintain their height and chewy center rather than spreading out flat on the baking sheet.When gathering ingredients, opt for softened butter for maximum flavor; consider using quality dark chocolate chunks to elevate your cookies. Alternatively, if your pantry is low, simply cut up a high-quality chocolate bar for melty pockets of chocolatey delight.Personalizing Your Cookie ExperienceEvery chocolate lover knows that the chocolate choices can make or break a cookie. Adapt the ingredients based on specific tastes: prefer less sweetness? Use semi-sweet chocolate instead of milk chocolate. Want to amp up the chocolate factor? Go all out with chocolate chunk overload!The Health Angle: Enjoying Cookies MindfullyAs a mom, striking a balance between indulgence and health is crucial. Understanding ingredient choices can help you incorporate healthier alternatives without sacrificing flavor. Consider using organic butter or non-GMO chocolate chips to make this treat slightly more nutritious. Moreover, think about portion control! Instead of one giant cookie, serve a couple smaller cookies to satisfy the sweet tooth while keeping in mind healthier eating habits.Engaging Your Kids in BakingEncouraging children to participate in cooking not only makes baking more fun but also teaches them valuable life skills. Allow them to help measure ingredients or stir the batter; this engages their senses and makes them feel proud of their contributions, fostering a love for cooking. Not to mention, it’s a delightful way to bond and create memories that will last a lifetime.Sharing the JoyOnce you’ve pulled the perfect batch of cookies from the oven, consider sharing with neighbors or friends. This isn’t just about treats; it’s about community. Get the kids involved in packing the cookies into fun little bags, making it a family affair. Such small gestures spread happiness and cultivate warmth in your neighborhood.Conclusion: Bake Some Joy Today!Now that you understand the delightful secrets behind creating Bakery Style Chocolate Chunk Cookies, it’s time to gather the ingredients and start baking! Imagine the smiles on your kids’ faces as they dive into these warm cookies, or how lovely it would be to have the wonderful aroma of fresh cookies wafting through your home. Don’t miss out on this sweet opportunity to create delicious memories—your family will thank you!

08.07.2025

Unlock Culinary Creativity with Homemade Seasoned Bread Crumbs

Update Why Homemade Seasoned Bread Crumbs are a Kitchen Essential In a world where convenience often trumps tradition, why not embrace the simple joy of creating something yourself? Homemade seasoned bread crumbs are not just a versatile kitchen staple but also a way to infuse your meals with a personal touch. With a convenient prep time of just 5 minutes, they can elevate your dishes, turning everyday staples into gourmet experiences. Say goodbye to store-bought versions laden with preservatives, and hello to a flavorful homemade alternative! Understanding the Versatility of Bread Crumbs Seasoned bread crumbs are not merely a side dish but rather an adaptable ingredient that enhances various recipes, from meatballs to casseroles. Their flavor profile, infused with garlic, herbs, and onions, adds a unique twist to any dish. For instance, consider using these crumbs to add a crunchy topping to a classic green bean casserole or as a binder in meatloaf. This versatility is why they are cherished by both home cooks and professional chefs alike. Making the Most of Leftovers In addition to their taste advantages, preparing seasoned bread crumbs is an excellent way to reduce food waste. Gather any leftover or stale bread you might typically discard—the heels of loaves, dried-out rolls, or buns—and transform them into something delicious. This not only saves money but also contributes to a more sustainable kitchen practice, a growing concern for many individuals who care about their environmental impact. Imagining Flavor Combinations The beauty of making your own seasoned bread crumbs lies in the flavor combinations you can explore. While the basic recipe includes essential seasonings like garlic and onion, why not experiment? Mixing in lemon pepper or Cajun spices can create a zesty kick, perfect for those craving bold flavors. For a taste of Italy, an Italian seasoning blend can turn simple bread crumbs into an essential ingredient in dishes like chicken Parmesan or lasagna. Practical Tips for Bread Crumb Perfection For those new to the bread crumb-making experience, here are some practical tips to ensure success. Start with denser bread varieties, as they yield more crumbs. Spread the bread cubes evenly on a baking sheet and bake until they’re dry but not browned. Once cooled, pulse them in a food processor to achieve the desired crumb texture. For storage, use an airtight container to keep them fresh for up to two weeks or freeze them for three months. This allows you to have ready-to-use seasoned crumbs on hand for whenever inspiration strikes! Emotional Connection: Cooking as a Family Food doesn't just fill our stomachs; it nourishes the soul. Making homemade seasoned bread crumbs is a perfect family activity, bringing generations together in the kitchen. Encourage kids to participate and learn about cooking basics while having fun. They can help tear the bread, measure seasoning, or pulse the mixture in the food processor. This shared experience fosters a love for cooking and creates treasured family memories. How to Use Your Seasoned Breadcrumbs Once you've made your seasoned bread crumbs, the possibilities are endless! Use them to coat chicken for a crispy dinner, sprinkle on top of a creamy pasta bake for added texture, or mix them into your meat mixture for flavorful meatballs. The addition of home-seasoned crumbs can easily transform any meal from bland to fab! Final Thoughts: The Power of Homemade Homemade seasoned bread crumbs represent a beautiful intersection of practicality and creativity in the kitchen. They allow cooks of all levels to exercise their culinary skills while also being mindful of budget and sustainability. So, why not take the plunge? Gather your leftover bread, spice them up, and discover how a little effort can enhance your meals significantly.

08.07.2025

Unlock the Secrets to Quick and Delicious Grilled Scallops

Update Why Grilled Scallops Are Worth Celebrating Grilled scallops, often associated with gourmet dining, are surprisingly simple to make at home, bringing an aura of sophistication that makes any meal feel special. Their delicate, buttery flavor paired with a char from the grill creates an unforgettable combination that can elevate any backyard barbecue or family dinner. When prepared with the right touch, scallops can transform your cooking and impress your guests. Perfecting the Art of Cooking Scallops Cooking scallops can feel intimidating to some home cooks, but understanding the basics strips away any fear. The most critical aspect of cooking scallops is their timing; they require just a few minutes on the grill. This brevity makes them perfect candidates for quick weeknight dinners or spontaneous gatherings. By using fresh, dry-packed sea scallops, along with simple seasonings like olive oil, lemon, and garlic, anyone can achieve restaurant-quality results. Simple Ingredients, Spectacular Results The beauty of grilled scallops lies not only in their exquisite taste but also in the simplicity of their preparation. Focusing on quality ingredients is essential. Opt for larger sea scallops over bay scallops when grilling, because they are meatier and stand up better to grilling. To marinate, combine olive oil, fresh garlic, and a squeeze of lemon juice to enhance the scallops' natural sweetness. For those looking to add a twist, consider flavoring your marinade with fresh herbs or spices such as thyme or paprika. Serving Suggestions That Shine Grilled scallops are versatile and can seamlessly fit into a variety of culinary themes. Pair them with bright, roasted vegetables like asparagus or snap peas for a fresh, balanced meal. If you're keen on incorporating pasta, a light lemon-butter sauce can complement the scallops beautifully, turning a simple dish into a gourmet experience. Additionally, if you’re planning a summer barbecue, serving grilled scallops on skewers, alongside other fresh seafood or seasonal vegetables, creates a delightful spread that pleases the palate. Keeping It Flavorful and Fun Embarking on your grilling adventure invites a chance to get creative. For example, try wrap scallops in bacon before grilling for that irresistible smoky flavor, or infuse them with a sweet and spicy glaze made from honey and chili flakes. If you’re hosting a larger event, consider making a grilled scallop platter with dipping sauces like aioli or tangy salsa. It’s all about creating an experience as memorable as the food itself. How to Avoid Common Mistakes Even the most experienced cooks make mistakes, particularly with scallops. A common error is overcooking them. The ideal scallop should be opaque with a slight firmness to the bite. When grilled correctly, the exterior will have a beautiful golden-brown crust while maintaining a moist interior. Remember to allow for resting time after grilling, which enhances their flavor and texture. Reheating Leftovers: The Right Way If you find yourself with leftover grilled scallops, reheating them can be just as delightful—if done right. Avoid the microwave, as it can alter their texture significantly. Instead, a slow reheat in a skillet with a bit of oil over medium heat revitalizes the scallops, allowing them to regain their former glory. Final Thoughts: The Community Connection As we gather around the grill, it’s essential to remember that food has a unique way of connecting people. Sharing recipes, tips, and stories over an enthusiastic backyard grill session can forge lasting friendships. Next time you’re grilling scallops, consider sharing your experience through social media or hosting a small get-together. Your culinary adventure could inspire others to explore the beauty of seafood and discover their own flair in the kitchen. Whether you’re a seasoned chef or a novice cook, grilling scallops is an accessible way to impress with flavor and simplicity. So fire up that grill and relish in the joys of good food shared with good company!

Terms of Service

Privacy Policy

Core Modal Title

Sorry, no results found

You Might Find These Articles Interesting

T
Please Check Your Email
We Will Be Following Up Shortly
*
*
*